Low-Power Timed Photography Camera
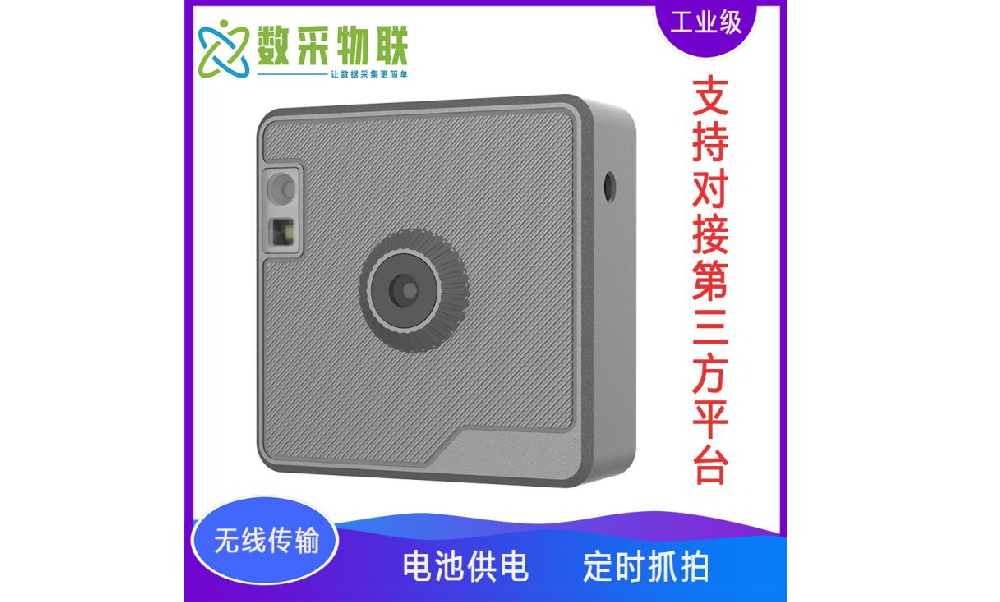
DAQ-LP-CAM is a compact, intelligent AIoT timed-photography camera. It pairs a 1920x1080 high-resolution lens with a small fill light, reliably capturing high-quality images and transmitting them to a management platform. Four dif…
Get a QuoteProduct Details
1 Product Overview
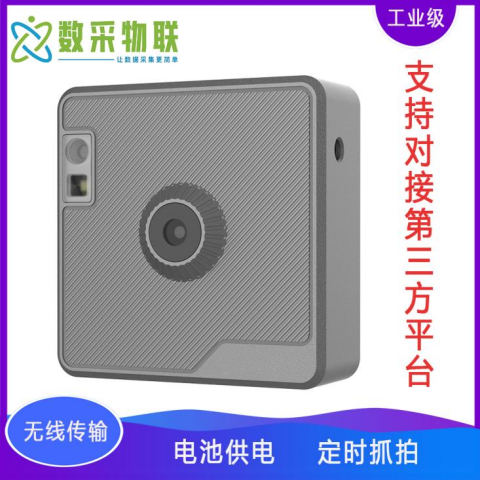
DAQ-LP-CAM is a compact, intelligent AIoT timed-photography camera. It pairs a 1920x1080 high-resolution lens with a small fill light, reliably capturing high-quality images and transmitting them to a management platform. Four different capture modes cover virtually every shooting requirement.
The camera is available in two wireless versions, LTE Cat.1 and Wi-Fi, and connects to platforms quickly over the standard MQTT protocol for easy remote data monitoring and management. Its intelligent sleep logic further reduces power consumption, giving a battery life of more than 2 years. Compact and stylish with simple installation, the camera is widely used for indoor snapshot applications such as remote meter reading in factories and machine-status monitoring.
3 Product Parameters
3.1 Product Features
- Two communication versions: choose the LTE Cat.1 cellular version or the Wi-Fi version to suit different network requirements.
- Two lens options: near-focus and ultra-near-focus lenses for a wide range of close-range shooting scenarios.
- High-definition image quality: a 1920x1080 high-resolution lens delivers clearer images.
- Strong stability: an external high-grade fill light keeps image quality high even in dark or low-light environments.
- Four capture modes: interval capture, timed capture, alarm capture and button capture cover every shooting requirement.
- Wireless deployment: battery-powered operation removes the need for cabling, enabling true wireless deployment.
- Ultra-low power consumption: battery powered with an intelligent sleep mechanism; with three shots per day and the fill light on, battery life reaches 2 years.
- Compact design: a compact structure with a dark grey / black industrial-style appearance that fits many environments.
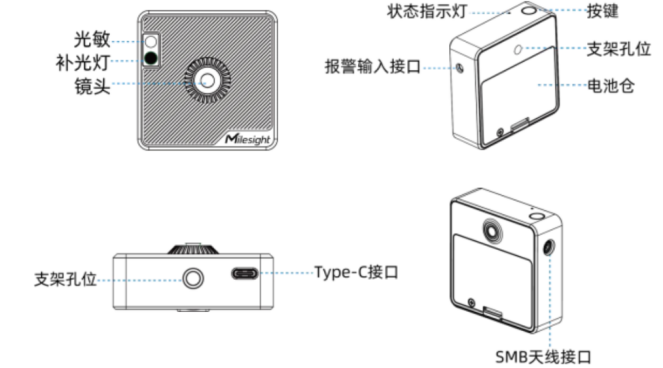
- Flexible mounting: universal bracket interfaces on the back and bottom of the device allow users to install it with any off-the-shelf camera bracket.
- Simple configuration: Wi-Fi fast configuration of the device.
3.2 Appearance
3.3 Dimensions
3.4 Buttons and Indicators
| Function | Operation | Indicator |
|---|---|---|
| Wake up device | Short press the button once | Off -> steady on |
| Capture one image | When awake, short press the button once, or trigger via the alarm input interface / software | Blinks twice |
| Device sleep | No connection within 1 minute, or no configuration action within 5 minutes after connection | On -> off |
| Restore factory settings | Long press the button for 3 s | Continuously blinking |
4 Power Supply
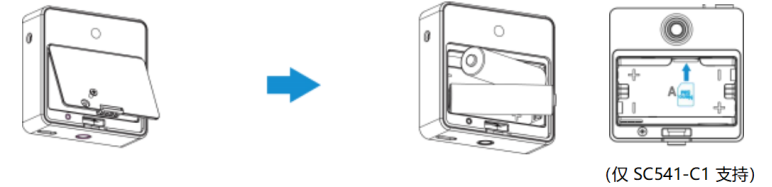
Unscrew the battery compartment and open the battery cover, then insert 2 batteries into the compartment. Note the polarity when installing.
Note: for Wi-Fi models, please purchase 2 AA alkaline batteries for power supply.
For 4G models, use the supplied 2 lithium-iron batteries. (Note: for 4G models, insert the SIM card before installing the batteries to provide network access.)
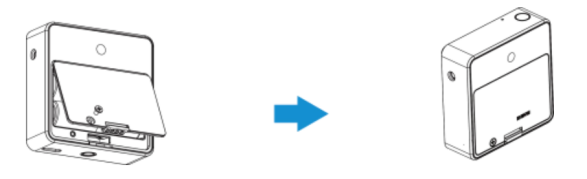
Replace the battery cover and secure it with the screw.
Note:
(1) If the device is not used for a long time, remove the batteries; otherwise battery leakage may damage internal components. (2) Always install new batteries, otherwise battery life may be shortened. (3) The device can be powered by battery or by Type-C (5V/1A). When both are connected, Type-C power takes priority. (4) The Type-C port does not charge the internal battery.
5 Installation
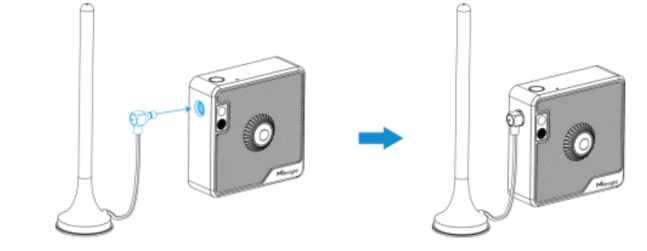
Step 1: For 4G models, first connect the antenna to the antenna connector on the device.
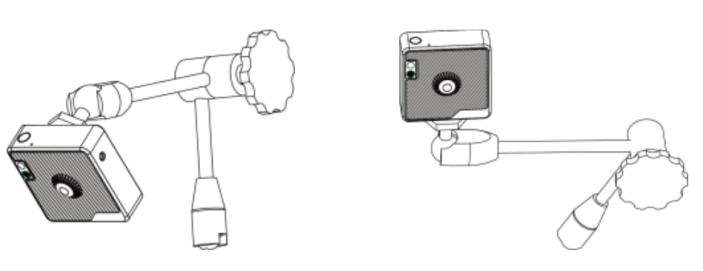
Step 2: Fix the device onto a universal camera bracket using the bracket holes. Choose the hole that suits your needs; the bracket must be purchased separately.
Precautions:
(1) The bracket hole size is 1/4-20UNC. (2) To avoid reflections from the surface of meters and other objects, do not point the lens straight at the target; keep a certain angle. (3) When the device PN is 1020, the distance between the device and the target should be 10-20 cm, with 15 cm being optimal. Log in to the device configuration page to check the image and adjust. (4) When the device PN is 0510, the distance between the device and the target should be 5-10 cm, with 8 cm being optimal. Log in to the device configuration page to check the image and adjust.
6 Login and Configuration
The device powers on automatically after being energized, and can then be configured and managed through a web page over Wi-Fi. Default settings are as follows:
SSID: DAQ-LP-CAMWiFi_xxxxxx (see the product label; xxxxxx is the last six digits of the MAC address)
Default IP: 192.168.1.1
Configuration steps:
Step 1: Make sure the device is properly powered, then press the button once to wake it up; the indicator lights up. Step 2: Enable Wi-Fi scanning on your computer or phone, find the corresponding SSID and tap “Connect”. Step 3: Open a browser, visit http://192.168.1.1 and configure the device.
Note:
(1) If no configuration is performed within 5 minutes, the device automatically enters sleep mode; press the button again to wake it before the Wi-Fi hotspot can be found. (2) To configure several devices in sequence, clear the browser cache after finishing one device before starting the next, or use the browser’s incognito mode, so that the configuration takes effect.
7 Device Configuration
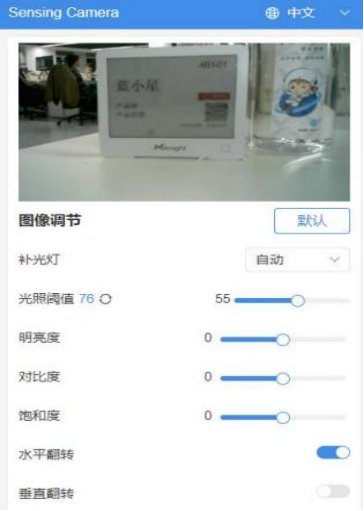
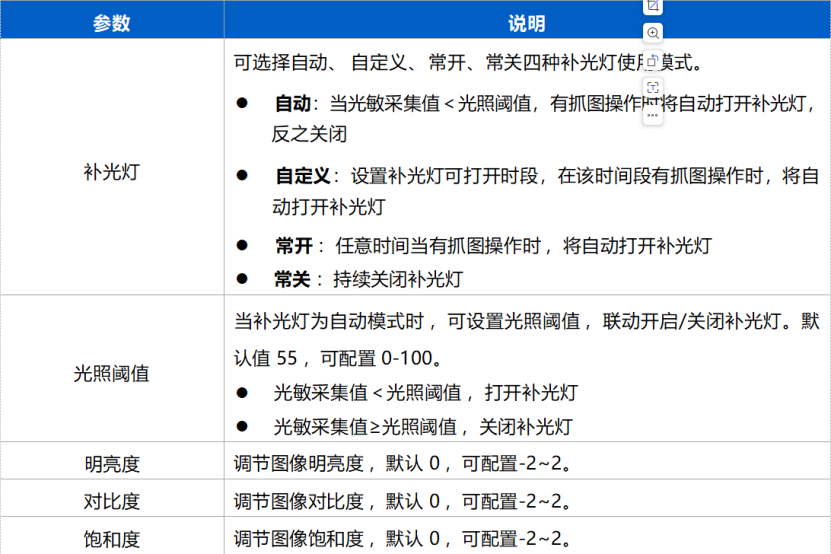
7.1 Image Adjustment
Adjust image parameters to obtain stable, high-quality images.

7.2 Capture Settings
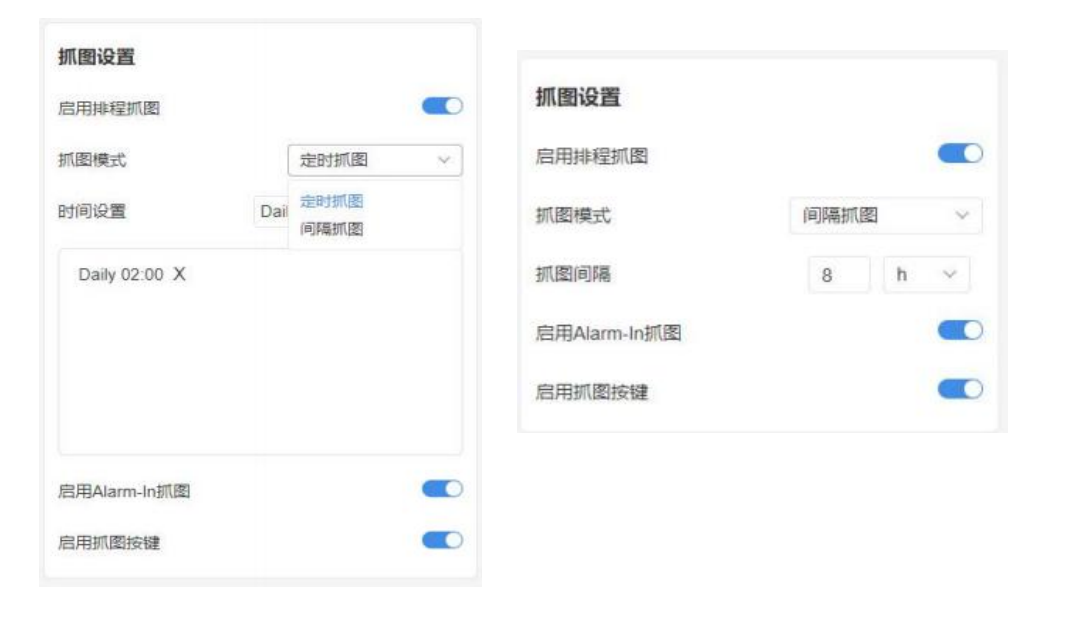
The device supports timed capture, interval capture, alarm capture and button capture. Set the capture mode according to your needs.
7.3 Data Reporting
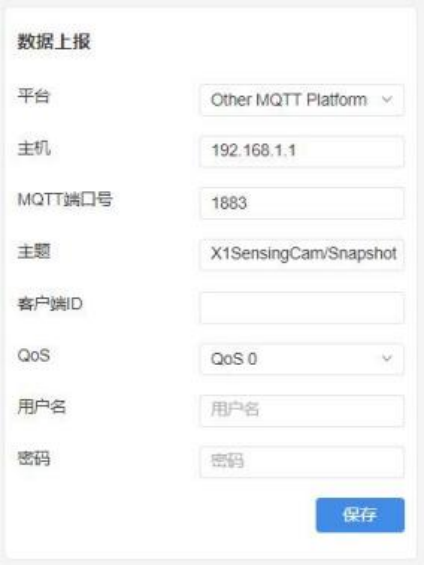
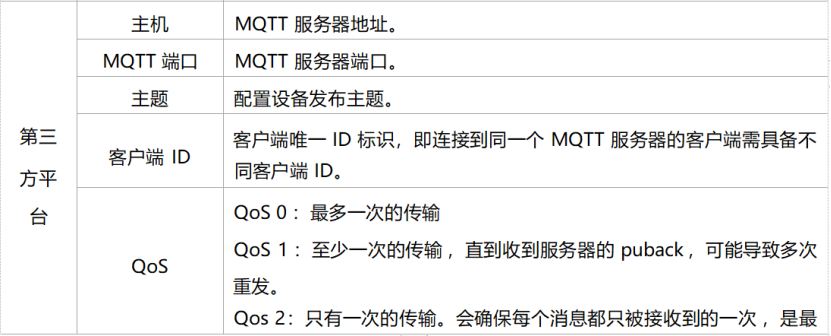
The device can connect to a third-party MQTT server over the standard MQTT protocol and transmit captured images to the platform in a timely manner.
Note:
(1) The device supports store-and-forward: when it loses connection to the platform, captured images are stored locally (up to 40 images) and re-transmitted as soon as the connection is restored. (2) On Wi-Fi models, data reporting is displayed only after the automatic pre-configuration and developer-platform takeover functions are turned off.
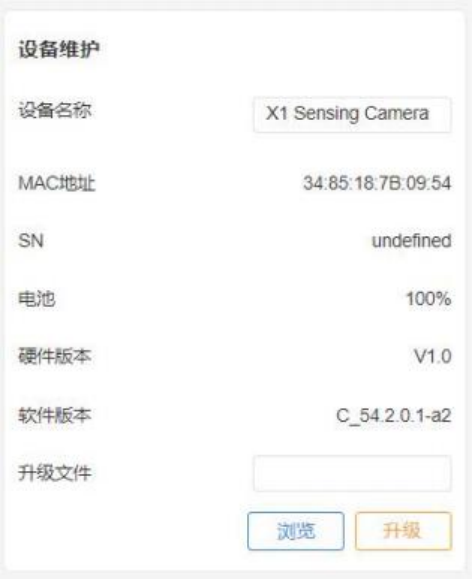
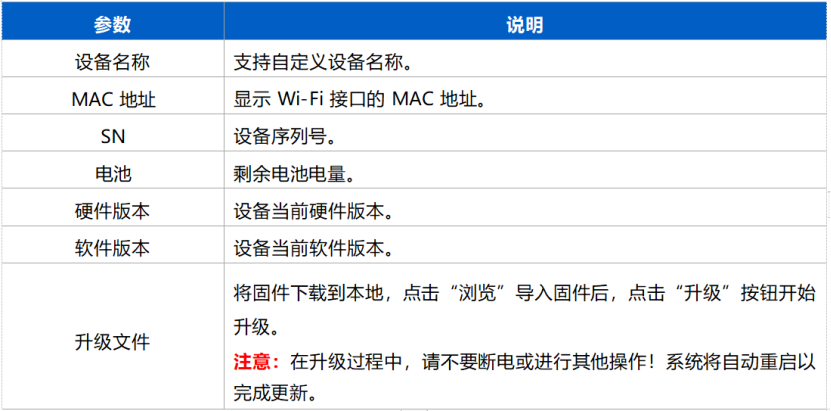
7.4 Device Maintenance
View device information and upgrade the device as required.
7.5 WLAN (Wi-Fi models only)
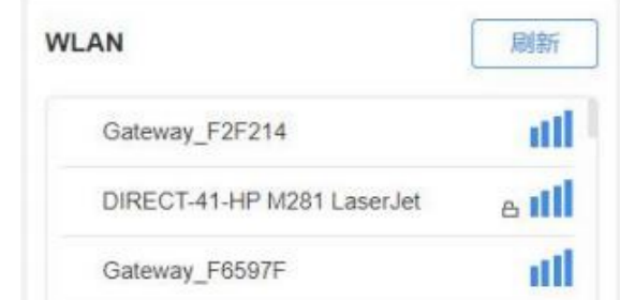
A Wi-Fi model can join a Wi-Fi network as a client and transmit images to the platform over Wi-Fi. Tap “Refresh” to search for Wi-Fi hotspots, then select and connect to a hotspot with internet access.
7.6 Sleep Mode
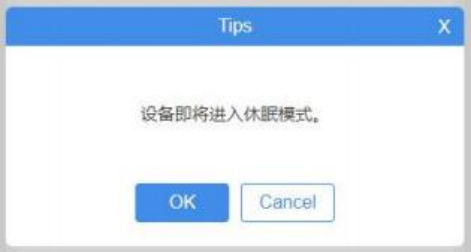
The device supports an intelligent sleep mode: it automatically enters sleep if no connection is made within 1 minute, or if no configuration action occurs within 5 minutes after connection. You can also tap the “Sleep Mode” button on the page to enter sleep manually.

8 Communication Protocol
The device can connect to third-party platforms over MQTT. Pushed data is in JSON format, in which the image data is base64-encoded.
{
"ts": 1689065610613,          // timestamp, capture time, unit: ms
"values": {
"devName": "X1 Sensing Camera",
"devMac": "1C:C3:16:43:01:62",
"battery": 82,
"snapType": "Button",        // "Button": button capture; "Timer": scheduled capture; "Alarm in": alarm capture
"localtime": "2023-07-11 16:53:30",  // upload time
"imageSize": 62163,
"image": "data:image/jpeg;base64,/9j/4AAQSkZJRgABAQA..."  // image code
}
}
9 Safety Instructions
- To protect the product and ensure safe operation, please follow this manual. The company accepts no responsibility for improper use or use not in accordance with this manual.
- Do not disassemble or modify this product.
- To avoid fire and electric shock hazards, keep the device away from rain and moisture before installation.
- Do not use the product in environments outside the specified operating temperature and humidity range, and keep it away from cold sources, heat sources and open flames.
- Do not subject the product to external impact or vibration.
- Make sure the product is installed securely.
- If the device is not used for a long time, remove the batteries; otherwise battery leakage may damage internal components.
- Always install new batteries, otherwise differing charge levels will shorten battery life.